F108 - Point Of Sale (POS)

Overview

Accessing the POS system

There are 3 different ways to sell items to a member:

  1. The first way to access the system is through the POS Control
  2. The second way to access the system is to go to a Member, Employee, or Prospect's profile and click the POS button on the relate bar.
  3. The third way is through the Membership Sale process. This process is covered in a different module. Click HERE to learn more.

POS Add Invoice

After clicking the POS button, you will be redirected to the POS Add Invoice screen. Depending if you are going through the POS Control or the POS Button on the Relate Bar in the Members Record, you will have different options to choose from.
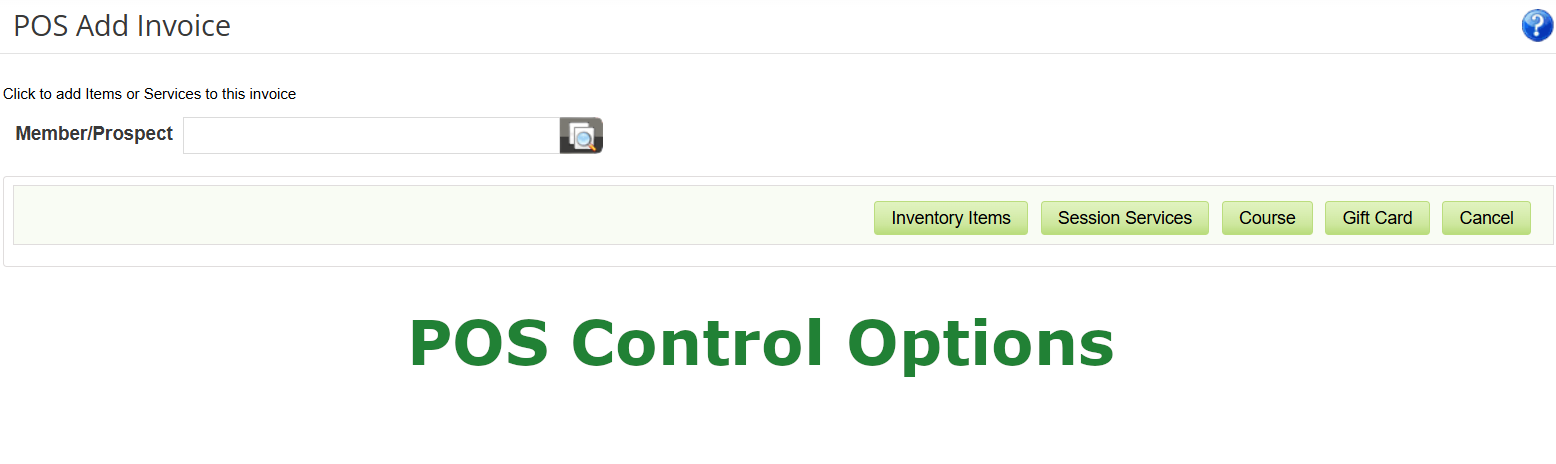
POS Control is the only way to charge a non-member/non-prospect for an item or Gift Card. If you choose a Session Service or a Course, it will prompt you to enter in information for a New Prospect before checking out. Otherwise, you can search a Prospect or Member in the search bar to pull up their saved payment methods instead of searching for them in the Member/Prospect list.
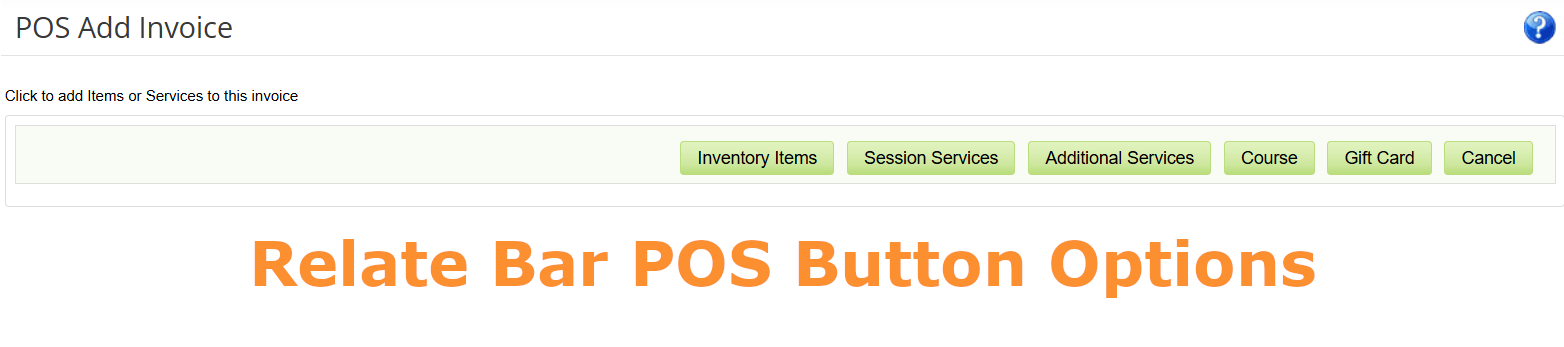
You will see an additional button when clicking the POS Button buto on the Relate Bar. This is the only way to sell an Additional Service.
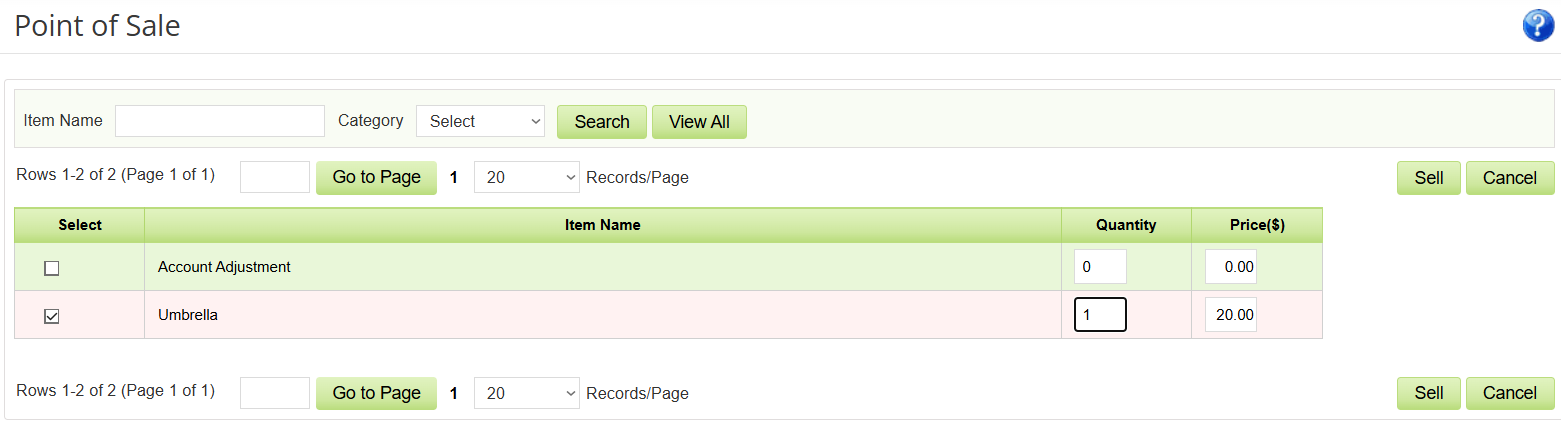
Selling an Inventory Item

When clicking Inventory Item on the previous page, you will be directed to this one. This is a list of all the items your facility is currently selling. Check the items the customer wishes to purchase on the left most column, and then click the Sell button on the bottom. You can change the quantity and even the price. Although, the latter depends on your facilities policy and what they set the floor price to. You can search the item by name or category on the top.


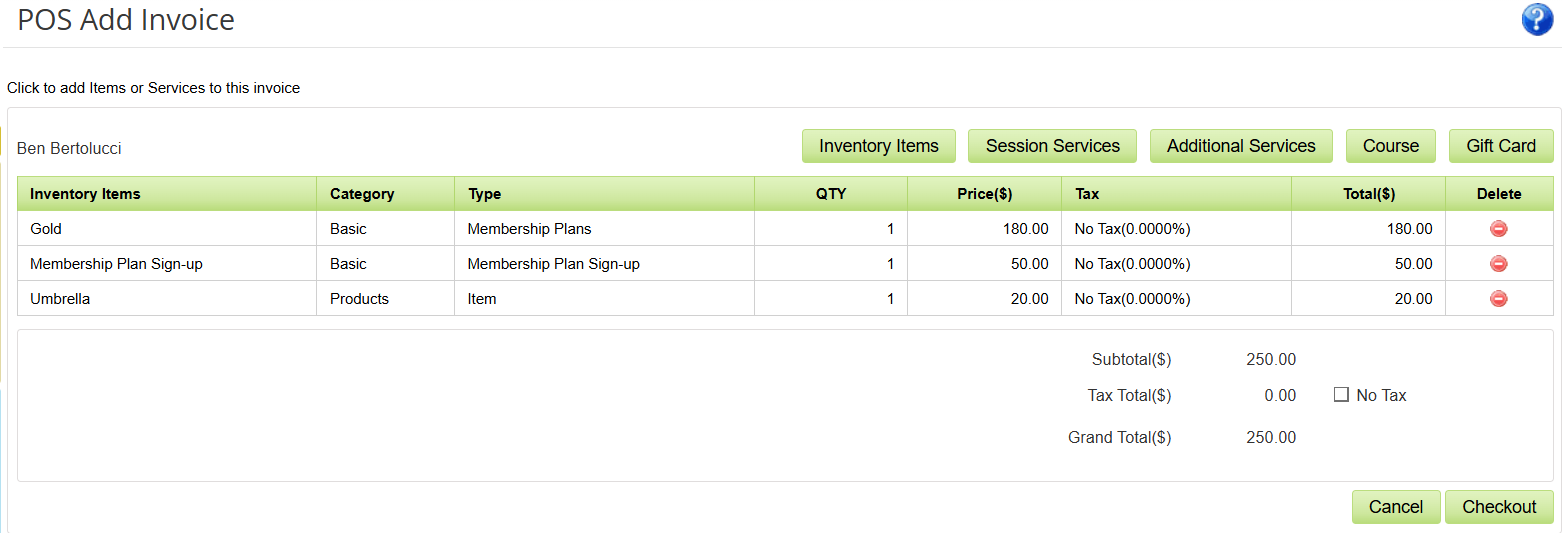
Once you have selected the Membership, Inventory Item, and/or Services, you can see the list before you go to the Checkout Screen. This is the last step where you will be able to edit the Items/Memberships/Services being sold without having to cancel the entire transaction and start from scratch.

For information on how to sell a Membership, click HERE For instructions on how to sell a Service click HERE
Checkout


Once you click Checkout, you will see this screen. The Amount Due up top is what the person owes, and the Paid Amount is what they have paid so far for this transaction. The Paid Amount will need to match the Amount Due for the transaction to Process.
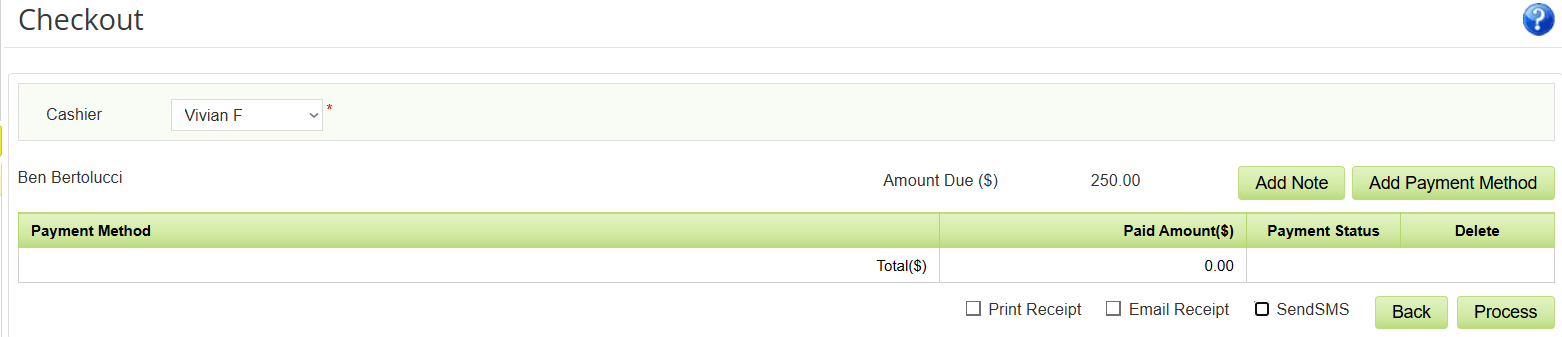
Click Add Payment Method to select how the person will be paying.
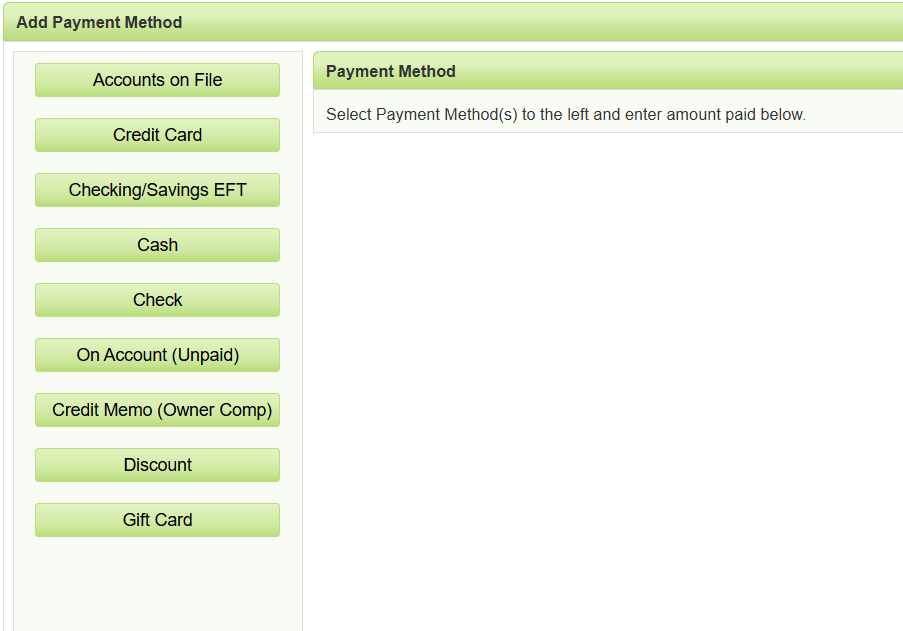
There are several ways to add a payment method. Some options may not be available if you are charging a non-member.

  1. Accounts On File: If you are checking out and chose a member, you might see this option on the top. When selected, it will charge the primary payment method on the Members record when you process the transaction.

  2. Credit Card: When selecting Credit Card, if the person is a Prospect or Member in your system, it will auto-fill their name. You can edit this. If your facility has a Credit Card Reader that works with our software, then you can click the Swipe Now Button to prompt the reader. Otherwise, you will have to manually enter the Credit Card Information.
  3. NOTE: To save the Card information to the Member or Prospects file, you will need to click the check box above the Name on Card labeled "Save credit card number to Payment Method on Account?"

  4. Checking/Savings EFT: i.e: Bank Account. This will ask you to input the Members bank account as the payment method. This option is not available for a non-member/prospect transactions.
  5. NOTE: To save the Bank information to the Member or Prospects file, you will need to click the check box above the Name on Account labeled "Save this bank (EFT) account to Payment Methods on Member's record?"

  6. Cash: If the person is paying in cash, you would input how much cash they gave you here. If you have a Cash Drawer that works with our software, when you click Save, it will automatically pop open the drawer unless your facility set the settings otherwise.

  7. Check:This is where you would input the check number and how much is being paid with the check. Follow your facilities policy on what to do with the check after the transaction.

  8. On Account (Unpaid): This is used for when you want to schedule a payment or payments in the future. Select "Payment Schedule" to select when the person will be charged. The number of payments depends on if you want the person to be charged once for the amount above on the scheduled date, or split the payments up. If you are splitting the payments, double check how much they are being charged per payment above, then choose the first date of their payment. Unfortunately at this time you are not able to select any other payment frequency other than Monthly. So each scheduled payment will occur on the day you selected each month.

  9. Credit Memo (Owner Comp): This is only used if you are giving something for free.

  10. Discount: This is where you can apply a discount to the total if applicable. You can select a flat or percentage rate, how much, the reason, and an optional comment.

  11. OPTIONAL - Customer Account ($.$$): This option will only appear if the member has a credit on their account. It will tell you how much the member has in the parentheses.

  12. Gift Card: If the member has a gift card that they are using for this purchase, this is where you would look up what gift cards have been sold to apply it.

Payment Receipt

Before Processing the payment, you can choose to Print out a receipt, Save it to your Device, Email the receipt to the Member, or if you have our SMS Package, Send the receipt as a text message to the member.

You can do so by checking the boxes near the Process button. - Please note that the receipt will only be sent to the members Primary Email/Number


If you wish to look at, save, or print the receipt, you will need to check Print Receipt before hitting Process. Only then can you view the next page -
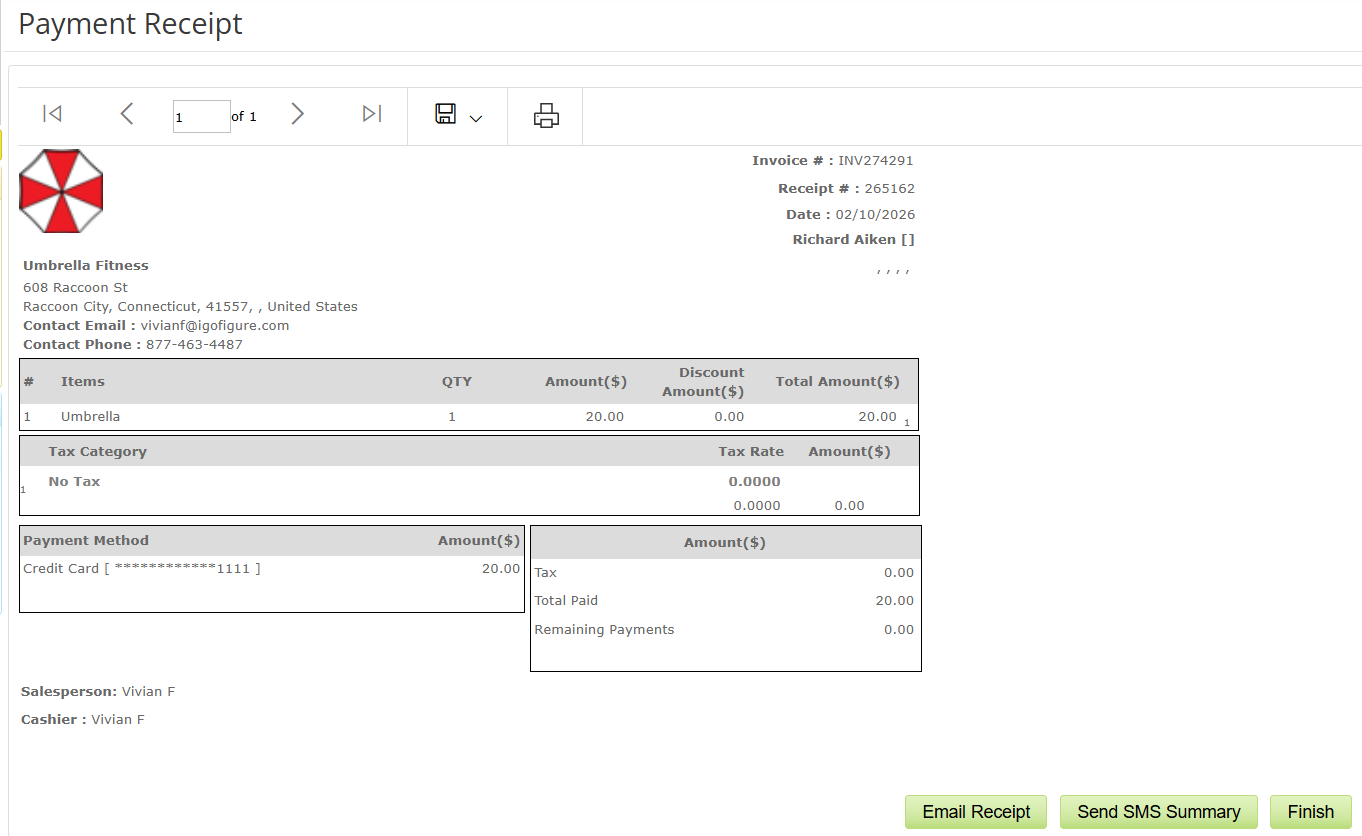
  1. If you wish to download the receipt on your device, click the Save icon at the top of the screen
  2. If you wish to print the receipt, click the Print icon at the top of the screen
  3. If you forgot to check the box before this page you can still email and send an SMS to the member by clicking the Email Receipt or the Send SMS Summary button in the lower right corner.
  4. Once done, click Finish


We regularly update the iLearning Center; if you come across any broken links, please don't hesitate to let us know.